
All you Need to Know to Grow Awesome Garden Peas
Let’s talk peas. Peas, glorious peas! Can’t you just taste them fresh from the garden? Yum!!!!
What? You’ve never grown peas before? But why not? They’re so easy to grow and there’s truly nothing like them. You NEED to keep reading so you can experience them for yourself.
Welcome to my new series “Crop of the Week“. Each week, on Friday, I’m going to publish a new post about a common garden fruit or vegetable. I’ll go through planting, caring for and harvesting your crop.
We’ll also chat about what to do with your harvest once you’ve got it in your kitchen, whether that’s preserving it or using it in some awesome recipes, so you can get maximum enjoyment from your gardening efforts. And who wouldn’t love that?
AND, even better, if you’re an email subscriber, you’ll be getting a FREE cheat sheet in the Resource Library (and your weekly newsletter) on that week’s crop, summarizing the information in the post in a two-page, easy-to-print and keep format. So if you’re not a subscriber YET, head on up to the top of the page and down a bit in this post to sign up. You can even print it out and keep it in your Garden Journal (more on that in a bit or you can check it out here!)
Are you ready? Let’s get started with one of the earliest crops you’ll be planting this spring: PEAS!!!!
This post may contain affiliate links. If you click on one of these links, I receive a small commission. This does not affect the price you pay.
Types of Peas
There are actually four different types of peas (who knew?)

- Sweet peas. These are the ones that don’t have edible pods, so you’ll be shelling them before eating.
- Snow peas. These have edible pods, but the pods are flat. They’re picked before the peas inside have a chance to mature.
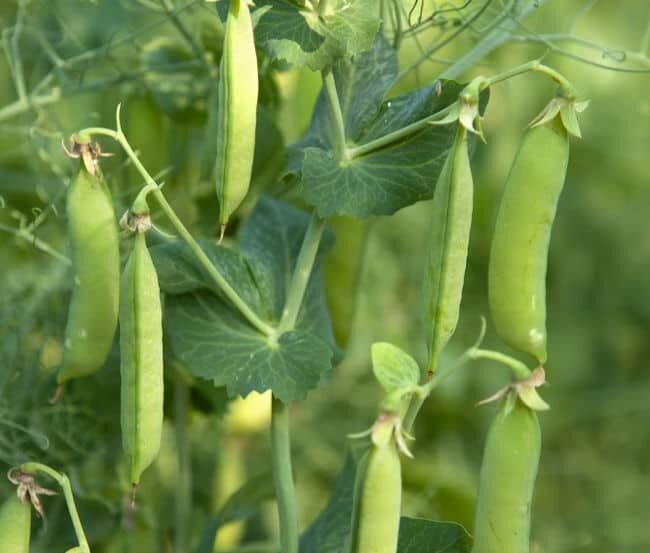
- Snap peas. These have edible pods as well, but the peas inside are allowed to grow to full size.
- Soup peas. These are allowed to remain on the vine or plant until the pod has turned brown. Then, the peas are dried thoroughly and used in soups, much like beans. I wasn’t as familiar with these, and if you’re like me, here’s a link to take a look at a few varieties.
Pre-Planting Preparation in the Garden
There are a few things you should plan on doing before planting your pea crop.
First, you may want to incorporate manure or compost into your garden where the peas will be planted. However, this really should be done in the fall before a spring planting. I have to admit I don’t always do this and my peas are beautiful, but it won’t hurt if you decide you’d like to do it.
Please remember NOT to incorporate raw manure in your garden beds in the spring right before planting. Besides the fact that raw manure will likely burn and damage your plants, the bacteria levels in noncomposted manure are unacceptably high. If you do decide to incorporate manure into your garden in the spring, get fully composted manure. It’s a totally different animal (pun intended) and is perfectly safe for food gardens.
Something you should do in the spring before planting is add some bone meal and wood ashes where your peas will grow. Bone meal provides phosphorus, and ashes provide potassium, two nutrients the peas need. If you don’t have access to wood ashes, kelp meal is a good alternative, and you can order it here.

One thing peas don’t need is supplemental nitrogen. Peas, beans and clover belong to the legume family, a very cool family of plants that work in concert with certain soil bacteria (called Rhizobia, in case you want to sound really intelligent and science-y at your next dinner party) to produce their own nitrogen.
Although I don’t advocate pulling all your pea plants at the end of the season (more on that below), if you want to see evidence of Rhizobia, pull just one plant and look at the roots. You’ll see “lumps” or nodules on the roots. These are where the Rhizobia live. If you’d rather just see a picture of them, here you go.
How to Support Peas
If you’re planning to plant the vining or pole type of pea, versus bush types, now would be the time to get some type of pea trellis up as well.
If you don’t have one and have some minimal woodworking skills, be sure to sign up for my email list here and you’ll get access to my Resource Library, where you’ll find plans for a customizable Garden Trellis you can build in just a couple of hours. This trellis is great for trellising peas, beans, cucumbers and other vining crops and flowers.
Pre-planting Preparation for your Peas
First, soak your peas in warm water overnight. You can just start with warm water and let it cool to room temperature. Don’t worry about keeping it warm, the peas won’t care!
If you’ve never grown peas in your garden before, the second thing you’ll want to do is purchase an inoculant. Remember that Rhizobial bacteria? That’s what the inoculant is, and it’ll give your peas a head start. Most garden centers should carry it this time of year, or you can order the one I use here.

Once your peas have soaked overnight, roll the damp peas in the inoculant just before planting. That’s it, easy peasy! Hehe, I’m feeling clever today.
If you’ve grown peas in your garden before, instead of buying inoculant, just take a shovelful of soil from wherever the peas (or green beans, they use the same bacteria!) were the year before and put it where your new crop is going. The bacteria live through the winter and will inoculate the new soil just fine.
Planting Peas Outside
Most authorities agree that you can plant peas outside when the soil has reached at least 45F. You can buy yourself a soil thermometer if you’d like. Here’s one you might want to take a look at. I like this one because it’s large and easy to read, and it will work to check the temperature of your compost pile if you have one also.
Another way to tell if you can plant is just simply to stick your finger into the ground. If it goes all the way down without resistance (from frozen soil), you’re good to go.
Peas like moisture, of course, but they don’t like to be soaking wet, so if your garden is quite wet first thing in the spring, you should hold off a little on planting. The other option would be to create raised beds or, at the very least, to hill your soil up 6-12 inches to keep the peas from drowning.

A pea trellis is a very good idea!
Peas should be planted about 1″ deep and just a couple inches apart. Some authorities say vining peas should be planted 6-8 inches apart, but I have to admit I plant mine closer together than that to maximize trellis space and have not had a problem.
What about snow? If you live in a colder climate like I do, you might be worried about your peas getting snowed on after you plant. Don’t worry about it, your peas won’t! Fun fact: The Farmer’s Almanac website mentions that Colonial farmers used to plow the spring snows under because snow picks up ammonia from the air and, as it melts, the ammonia breaks down into nitric acid, feeding the soil in the process. Cool, huh?
Watering Pea Plants
Peas don’t need quite as much water as some other garden crops, probably because they’re a cooler-season crop. One-half inch per week is sufficient until they flower, then one inch per week is preferred. If mother nature doesn’t cooperate, supplemental watering will be necessary. In my part of the country, I rarely have to water peas because our springs tend to be wet.
Weeding Peas
Peas have superficial and delicate root systems, so hand weeding is a very good idea.
Mulching Peas
Which brings me to mulch. When your baby plants are 8-12 inches tall, give them a nice 2″ layer of mulch. Besides keeping weeds down, the mulch will help cool the plants as the weather warms up, and they’ll thank you by continuing to produce longer than they would have otherwise.
Unfortunately, once temps get consistently above 70F, your peas are likely to quit producing no matter what you do.
Pea Plant Pests and Diseases….and what you can do about them
Because your peas will be growing so early in the season, you may find, like I do, that you don’t have many pest or disease problems. In fact, I’ve not yet had to deal with anything eating or damaging my plants.
However, there are a few pests that might give you some trouble.
Aphids
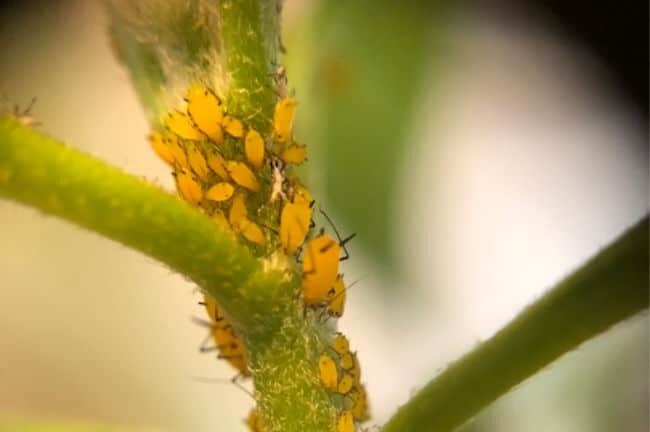
be many different colors, ranging all the way to black.
Oh, I do hate aphids! They eat my honeysuckle and my milkweed every summer and drive me nuts! Funny enough, though, although they’re considered a pest of peas, I’ve never seen one on my crops.
If you do find aphids, you have a few options. A cold blast of water from a hose might be enough to get rid of them. You can also try sprinkling your plants with flour. Apparently, this constipates the little buggers…*giggle*
The more typical neem oil and insecticidal soap can also be used, of course, but you may want to try planting catnip close to your peas, as aphids don’t like it. Aphids also don’t like garlic or onions, but most authorities DO NOT suggest planting these close to peas, as they may inhibit their growth.
Aphids LOVE nasturtiums, so planting them a little distance from your peas as trap crops may be helpful. Just remember to kill the little buggers when you see them on the nasturtiums!
Mexican Bean Beetles
These guys look like yellow or orange ladybugs when they’re mature, and you can see a picture of their larvae here. The easiest way to deal with them is to handpick them. However, they also have an aversion to rosemary and marigolds, so you might want to plant some of those around your pea plants as well.
Diseases
The best way to deal with most diseases is never to get them, which is easier than it sounds! First, you can plant varieties that are resistant. I just found this AWESOME chart from Cornell University that lists pea varieties and their resistance to various diseases.
Another great way to keep from getting diseases (and this goes for all crops, not just peas) is to rotate your crops each year, and do your best not to grow peas in the same place more than once every 5 years (or as long as is feasible).
For downy mildew, in particular, avoid watering from above, which wets the leaves. You should also make sure not to harvest when the leaves are still wet in the morning. Again, this applies to all crops, as many diseases spread more easily in water and your damp hands can spread undesirable things from one plant (or crop) to another.
Harvesting
There are really only two things to remember when harvesting.
First, as mentioned above, be sure the plants are dry when you harvest. This will keep you from spreading any diseases from plant to plant. Morning is a good time to harvest as long as the dew has dried, as the peas will be at their sweetest.
The other thing to remember is that pea vines are delicate, so be sure to hold the vine with one hand while picking peas with the other. Another option is to cut the peas from the vine, which lowers even further the risk of damaging the plants.
Post-Harvest in the Garden
Don’t pull your pea plants once they’re done producing. Cut them off at soil level and leave the roots in the ground to rot. This will help to concentrate the nitrogen and beneficial bacteria levels and feed a later crop. Why not take advantage of as much free fertilizer as you can, right?
Post-Harvest in the Kitchen
Assuming your peas make it as far as the kitchen and don’t all get eaten outside……
Eating peas fresh is, of course, ideal, but you might want to save some for future eating.
In my opinion, freezing is the best way to preserve peas. You should blanch peas (whether sweet, snow or snap) for about 1 1/2 minutes, then cool, drain, pack and freeze immediately.
NOTE: I would err on the side of a bit less blanching time with snow peas as they tend to get mushy easily after freezing. I think a minute is enough for them, honestly.
If you’d like to try your hand at home canning peas (which lots of online authorities assure me are much tastier than the commercially canned ones *shudder*), you can find a recipe here.
**Please, please, PLEASE remember that you MUST use a pressure canner for peas and follow a tried and true recipe, as they are a low-acid food and you DON’T want botulism. Really!**
Saving Seeds for Next Year
Saving peas for planting the following year is great because it’s so easy!
Allow some pods to mature on the plant until they’re dry and brown. Then pick them, shell them and put them in the freezer for three days to kill any bugs. Store them in a cool, dry place and you’ll be all set for next year!
Note that approximately 4 ounces of dried peas will plant a 10-foot double row.
Recipes
Last but not least, I did promise you a recipe or two, so here you go:
Green Peas in Cream – My husband’s grandmother used to make something similar to this and they were AMAZING! I haven’t tried this specific recipe, but once I have fresh peas, I will!!!!
Italian Peas with Garlic – Fresh peas and garlic, need I say more?
FREE Cheat Sheet!
You may remember that I mentioned a FREE cheat sheet at the beginning of this post. Yup, FREE. All you have to do is sign up to be an email subscriber and you’ll find it in the Resource Library (you’ll receive the password in your welcome email). Please don’t hesitate to sign up, I send just one newsletter a week with happenings around the blog (with a very occasional extra email if something special is going on), and I’ll NEVER spam you, I promise! You can sign up here for all the goodies.

You may also remember I mentioned a printable Garden Journal back at the beginning. I’m SO excited to finally have this done and available to you all! I spent a lot of time thinking about what I would like in a journal (much of which I haven’t been able to find), and then incorporated it all into a printable journal for you. I call it the last journal you’ll ever need and I mean it! You can choose to print as many or as few pages as you need or want, and print it year after year, and I know you’ll agree it’s a valuable resource once you see it. Curious? Check my Garden Journal page here for all the juicy details!
As always, I love comments on my posts and answer every single one. Be sure to pin one of the below images to your Garden Vegetables board so you have it for later reference.
Smile and have a crazy organic day!
Posts Related to Growing Garden Peas
- Soil Organic Matter
- Eight Simple Tips for Beginning Gardeners
- Planning Tips for your Spring Garden
- No-Till Gardening
- A More Sustainable Garden


10 comments
Loved reading your post and learning new things! You’ve inspired me to try them again – picking peas is a great childhood memory!
Oh, they’re just so good! So many never even make it into the house because we eat them all right in the garden!
I am planning on planting peas next week. Last year I planted them a little too late and the burned up before producing too much. Hoping to get the full crop this year!
I was late last year, didn’t get them in until the beginning of April but they did ok (Zone 6B). This year, I’m hoping to get them in the end of this week or very beginning of next depending on the weather. I have to go get some sweet peas first, hubby complained that I was only going to plant snow peas. LOL
The first time I ever grew sweet peas, I ate them while I was still in the garden! The next time I picked them I did save them until supper, but put them right into our salad. I was HOOKED! So delicious.
I haven’t tried growing them here in AL yet… it gets HOT so quickly. But I will be giving it a shot one of these days.
constipated aphids??? LOL
🙂 gwingal
The constipated aphids made me giggle. I don’t know much about growing things where you are, but wondering if you could plant them in the fall or late winter?
Another excellent post! I remember the first time I grew snow peas and took visiting children to the garden to eat off the vine. They were TOTALLY amazed! so amazed their parents came to the garden because they’d never eaten (anything) off the vine. Dawn, you’re doing good work!
Thank you! I think the memory like that for me was when I was a kid and my grandmother grew kohlrabi. I had never even seen it before, and was just amazed at it. She was a gardener extraordinaire, I wish she were still here to tell me everything (or even half) of what she knew.
Green peas grow really well for us up here! We’re planting extra this year, to blanch and freeze as we did last year. Saving this post to try that peas and garlic recipe!
I would imagine you’d have great pea growing weather there a lot longer than we do here! Enjoy them!