
A Fun and Festive Craft for the Holidays (or Anytime!)
Today’s post is a bit different than what you’re used to from me: A festive fabric scrap wreath for the holidays! Not something I would normally write about, but I just LOVE the way it came out and it was so easy that I really HAD to share it with you!
This is a super fun, easy, and quick craft that works up so beautifully and will add a festive touch to yours or a lucky friend’s home this holiday season.
First, to give credit where credit is due. The inspiration for this craft came from Clarissa over at The Crafty Middle Sister. After reading her Fabric Scrap Garland post (be sure to check it out!), and making a garland, I thought it would be fun to use the same technique to make a holiday wreath.
The best part of this is that if you have enough fabrics in your stash, you may be able to make this gorgeous craft for just $5 or so (for the wreath form). How’s that for awesome?!
So, without further ado, let’s do this!
This post contains affiliate links. When you make a purchase through one of these links, I receive a small commission. This does not affect your purchase price.
Materials
Fabric scraps

Cotton quilting fabrics are going to be easiest because they tear easily. You’ll want a good selection of colors and patterns, at least 8 to 10 different ones.
It’s hard to estimate how much fabric you should have, but start with 4 to 5 yards on hand for a wreath the size of the one I made (more on that below). Don’t tear all of it until you see whether it’s needed, that way you’ll have it for future projects.
Most of the fabric I used came from my stash, and I purchased a few small fat quarter collections like these to expand the colors and patterns.
Wreath Form

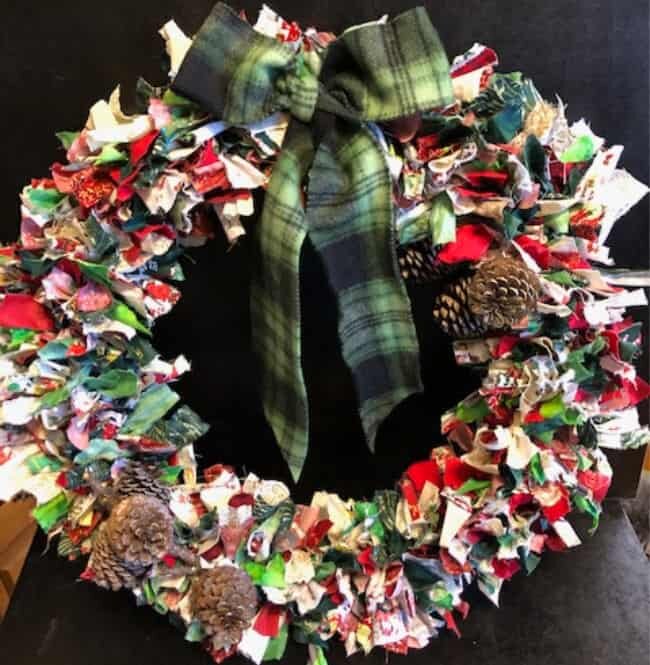
Tying on all 4 layers made a very thick and
full-looking wreath
You can check out lots of different wreaths here.
The wreath I used was an 18″ metal form. Obviously, if you do a smaller one, you’ll need less fabric and it will take less time. I’ll probably try some smaller ones at some point, as the 18″ was a bit overwhelming, to be honest.
Basic Supplies
You’ll need a decent pair of sewing scissors and a measuring tape. That’s about it!
Optional
Pine cones, a bow, or any other decoration you might want to add.

Step-by-Step Directions
Step 1- Tear your Fabric Strips
Start by tearing your fabric. You’ll want strips approximately 3/4″ to 1″ wide. Any wider becomes tough to tie, any narrower doesn’t fill the wreath out as nicely.
The easiest way to do this is to cut a small slit at one edge of the fabric, then just grab the fabric on each side of the slit and tear. Easy peasy!
I used strips approximately 9 inches long. This made them very easy to tie.
However, I did have to trim many of them so they didn’t just hang off the wreath, but looked “fluffier”.
That said, if you want to minimize waste, I would suggest making strips anywhere from 7 to 9 inches long, then try tying them to your wreath form. If your fingers can handle tying the 7 inch length, you probably won’t need to do much trimming.
Note: Remember that you’re going to be repeating the tying step hundreds of times, so go with a length that’s comfortable, even if you end up with a little bit of waste. Trust me, your hands will thank you later!

You’ll also notice that some fabrics fray more than others. I discovered that prelaundered fabrics seem to fray much more than unlaundered ones, but the prelaundered ones were easier to tie. Give both a try and see which you like best.
Step 2: Arrange your Fabrics
Honestly, I didn’t really arrange my fabrics. I just kind of mixed them all up in a pile and picked from there.
As I went, if I felt that one area of the wreath was getting too heavy in reds or greens, I would add the other color, or some white to break things up. I really didn’t stress about trying to keep to a pattern, it just wasn’t worth the effort in the long run.
Step 3: Start tying!

Get comfy and start tying! I tied a double knot in each strip, trying to keep the tails approximately even in length.
Because the wreath form was split into 9 sections, I worked one section at a time. You can figure out what works best for you, but I would tie a few pieces on the inner circle, then a few on the next circle, etc., before moving on. This seemed to be easiest so I could see what I was doing.
NOTE: I did try only tying the first 3 circles and leaving the outer one empty, figuring it would save on work and fabric. It looked *okay*, but the wreath wasn’t nearly as full as I wanted, so I went ahead and tied all 4 circles.
Finishing Touches
Once I got my wreath finished, I decided it looked just a little bit plain. Hmmmm….what to do?

I had collected a whole bunch of small pine cones from a downed tree this fall, so thought, “why not?”
First, I sprayed them with adhesive like this. Then I added glitter. Because, really, doesn’t glitter make everything better?
I hot glued the cones to the wreath. Now, my cones were still attached to the branches, but I don’t think I’d recommend this. It made them heavy and difficult to attach. Pretty sure individual cones would be better.
Once that step was done, I still wasn’t completely happy, so I grabbed a small piece of flannel and made a simple fabric bow. Ahhhh….much better! Now it’s done and ready to be hung on my door when I do my Christmas decorating!
The beauty of this wreath is that you can make it for any holiday or season of the year. Want something for Easter? Use pastel pinks, blues, yellows, and greens, and add a cross or bunnies. Need something patriotic? Red, white and blue with mini flags will hit the spot.
Ooooh, how about a beach-themed wreath? Whites, silvers and blues, maybe some bluish-greens, with seashells! I can just see it now!
What kind of wreath will you make? Let me know in the comments! I’d love to get some more ideas, and maybe I’ll do a follow-up post for some other seasons.
I hope you’ve enjoyed today’s post and it’s inspired you to try your own wreath! Please be sure to save it for later by pinning one of the images below to your Holidays or Crafts board on Pinterest.
As always, thanks for reading, smile, and have a crazy organic day!
This post was shared on the You’re the Star blog hop. Come on over and check out all the amazing posts from other gardening, homesteading, crafting and recipe bloggers!
Posts Related to Festive Fabric Craft Wreath
- Lavender Sachets
- Succulent Container Garden
- DIY Reusable Bags
- DIY Succulent Birdcage Fairy Garden
- Easy DIY Succulent Wreath


4 comments
I love it. Would be worth the time to make to be used every year..
Exactly! And if you have a good-sized fabric stash, it’s a great way to use up and recycle some scraps.
I bought a very small one from the thrift store and I love it. It is not Christmas colored thought. It is solid blue. I love it and it looks great in my home. Now I want to try making one.
🙂
You definitely should! It was a lot of fun to make.