
Supplies you Absolutely Need to Start Seeds Successfully Indoors
It’s almost the most wonderful time of the year! No, not THAT most wonderful time of the year (Ho! Ho! Ho!), the OTHER most wonderful time of the year ~ Indoor Seed Starting Time.
Yes, in the middle of a snowstorm (coming tonight- UGH!)) it’s time to think of spring and all those wonderful vegetables I’ll be growing in just a few months.
Introduction: Seeds vs. Plants
Maybe you’d love to start seeds indoors, but you’re afraid it’s too complicated, difficult or expensive so you haven’t taken the plunge. I get it! I only bought vegetable plants for years because I figured growing plants from seed would be too much for me.
Here’s the thing, though, if you’re growing a vegetable garden big enough to feed an entire family, buying all your plants is going to get really expensive, really fast. When you consider that a 6-pack of pepper or tomato plants can run upwards of $3-5 depending on what area of the country you’re in, you can see that buying plants will become quite the investment.
Never fear! By the time you’re done reading this post and the one coming next (where you’ll learn the 8 super simple steps for successful seed starting), you’ll be all set and ready to successfully grow your own beautiful seedlings at home with a small investment and lots of confidence.
And don’t forget, you can contact me anytime at my email address or via the comments here with questions (I answer every one personally).
So, let’s take the plunge and get started, shall we? Here are your five essentials….
Essentials for Seed Starting
Seeds ~ What and How Many Varieties to Grow

First, of course, you’re going to need seeds. As I’ve mentioned in other posts on vegetable growing (Container Vegetable Gardening and Planning Tips for your Spring Garden), the most important consideration is deciding what types of seeds to grow. So, how do you do this?
Personally, I believe that picking the varieties your family already loves is a great first step. Maybe you can’t wait for that first fresh tomato from the farmer’s market, or those awesome zucchini Aunt Sally gives you every year. Why not grow them yourself?
If no one will eat a green bean even if someone puts a gun to their head, please don’t grow green beans! I mean, if your aim is to feed the neighborhood or donate to a local food bank (certainly noble aspirations), then by all means plant the green beans.
The thing is, though, most people have limited growing space, so I would prioritize what you’re growing for your own family first, then if you come to realize after your first year or two of growing that you have enough room, expand and grow for others as well. (And then let me know how that works…..I keep expanding my garden because I don’t have room for everything I want to grow!)
The other consideration is how many different varieties of plants to grow. As I’ve also said before, if you’re a new grower, PLEASE don’t pick a dozen or more different types of vegetables your first year out. You’ll be so much happier and have so much more success if you pick 5 or 6 vegetables to start and expand gradually over the years.
Now, if you’ve read my Seed Varieties I’m Trying this Year and Why post, you’re going to say, “But you’re growing more than a dozen new varieties, never mind all the OTHER stuff (and you might even say it in a whiny voice).
Well, yeah, I am. Do as I say, not as I do.
Ok, ok, I know, that doesn’t work with kids OR whiny readers of blogs. How about this? I’ve been growing for a long time (25+ years) and I have a good feel for what plants need, even if the actual variety is new to me.
Plus, I’ve been growing long enough that if something doesn’t do well, I try something new or just shrug my shoulders and move on. The frustration level is just not as high as it was when I first started gardening, but I don’t want YOU to get frustrated and quit, so take my advice here, ok?
Seed Companies I’m Comfortable Recommending
You can check out my blog post on my favorite seed companies to see which companies I like.
One company I particularly love is Baker Creek Seeds. They’ve come out with a book on heirloom vegetable gardening which is fantastic. I reviewed it here, and there’s a link in that post if you’d like to order it (which I highly recommend, particularly if you’re new to all this stuff!)
There are tons of other great seed companies out there, but we’ll move on for now.
This post contains affiliate links. When you make a purchase through one of these links, I receive a small commission. This does not affect your purchase price.
Growing Containers
You’re certainly welcome to buy and use the commercial seed starting containers you’ll find in any garden center or here and here on Amazon.
However, that can get expensive, so I’ll give you some cheap (or FREE!) alternatives. I’ve been saving small plastic containers around the house for months. Hubby and mom both like Jello (**shudder**), so I save those containers, as well as pudding and yogurt containers. I also save the small square containers cherry tomatoes come in.

If you buy organic garden greens, they often come in a large plastic container with a lid. These are wonderful because the lid will come in handy later (I’ll explain) and you can grow a bunch of seedlings in one place.
Just make sure whatever you use (particularly if it’s plastic) has a hole (or holes) in the bottom of it (or you drill a hole or two for drainage).
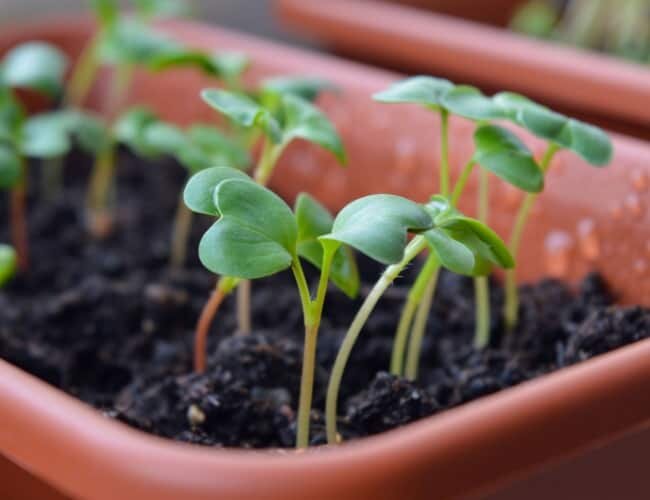
You can also start seeds in egg shells, egg cartons or make your own newspaper seedling pots. The advantage of these is that you can just plant the whole thing, so there’s no root disturbance. I haven’t tried any of these options, however, so can’t speak to how well they work.
You’re also going to need trays under the containers so you don’t end up with water everywhere. Again, you can buy some really expensive trays, OR you can go to the dollar store and buy roasting pans. Yup, roasting pans (you can see them in the picture above). I just visited our local dollar store a couple of weeks ago and got 19 roasting pans (some of them had lids, too, which work as trays) for $13. Not bad!!!
Potting Soil
I’m going against conventional wisdom here (that’s right, I’m a rebel!). I don’t use seed starting mix as is recommended by most gardening experts.
I have used it in the past and had decent results. However, my problem with it is that seed starting mix has no nutrients to start with, and almost no ability to hold nutrients, so you will be feeding your seedlings A LOT once they start growing.
I buy a good quality growing mix and add soil enhancer to it before I plant my seeds. Ahhhhh….Travesty! Sacrilege! Traitorous teaching! Sorry, I digress. I’ve been using my potting soil/compost mix to start seeds for years now and have had no problems (zero!) with it.
I used Fafard potting mix for years because I could get it locally, but my local place closed and the stuff online is RIDICULOUSLY EXPENSIVE! One cubic foot for more than $30? Um, nope! I don’t care how good it is, I’m not spending THAT! However, if you’d really like to, here’s a link for you.
So, I’ve had to find something else. I’ve been using this Lambert growing mix and mixing in some Soilution. I use this combination for all of my seed starting and houseplants now and absolutely love it.
Now, I wouldn’t necessarily recommend ordering potting soil, as shipping is going to hurt badly, but if you have a decent-sized garden center close to you, you can probably find something similar to what I use.
Grow Lights
First off, it’s tough to start seedlings in a windowsill. If you have a south-facing window that isn’t drafty (at all!), you might be able to get away with it, especially if you’re only growing your seedlings for a couple of weeks.
BUT, keep in mind that seedlings need 12-14 hours of light a day, not something you can do with sunlight this time of year unless you’re far south, and then you probably don’t need to start seeds indoors anyway!
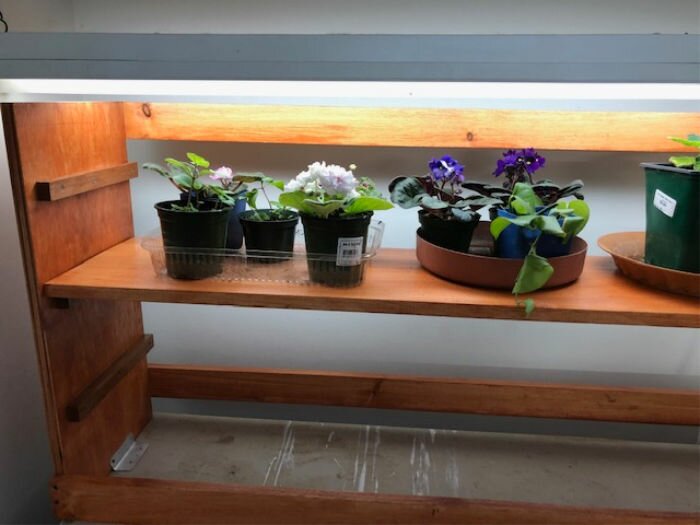
The shelf is adjustable so once I start seedlings, I can move them closer
or farther from the light as needed (hubby is handy, it helps!)
So, grow lights. Again, as before, there are expensive options, and there are much less expensive options.
First, the expensive ones. You can buy a whole grow light setup like one of these if you’d like. In all honesty, you’ll probably get the very best, optimal results from something like this, but as you can see, you’ll also pay through the nose, and you’ll likely need several as they really don’t cover much area.
Since I have a TON of lights, I can’t afford these. If you’re in my boat, here’s what you do.
An Awesome Cheap Grow Light Hack
Go to Home Depot/Lowe’s/your favorite home improvement store. Find their fluorescent tube lights (4 foot lights are ideal if you have room, otherwise get 2 foot ones). Now, look at the package the actual bulb comes in (not the light fixture the bulb will go into, the tube light itself).
You’re looking for a 4-digit number with a K after it. Like, 2700K or 6500K. You can see in the example here that after the word “daylight” it says (6500K). This is what you’re looking for.
Now, since most fluorescent tube fixtures hold 2 bulbs, you want to get one bulb labeled 2700K and one bulb labeled 6500K (there is an exception to this that I’ll get to in a moment).
The 2700K bulb mimics the “red” spectrum in sunlight that stimulates flowering. The 6500K bulb mimics the “blue” spectrum in sunlight that stimulates vegetative growth.
If you’re going to use these lights exclusively for seed starting, getting two 6500K bulbs is fine. However, if you think you might want to use them later for houseplants, get the two different bulbs.
As you saw if you checked out the bulb example above, fluorescent tubes will run you about $10 for two, while the fixtures, depending on what you select, will be around $25 each. Much less than the “grow lights” that can run into the hundreds of dollars for a light that will cover a rather small area.
Heat Mats & Thermostats
Last but not least, a heat mat and a thermostat for it are a really nice addition to any seed starting setup. Is it strictly necessary? No, I’ve had success without a heat mat.
However, many seeds germinate best at temperatures much higher than the average household temperature in the winter, so a heat mat is a good investment. They’re not that expensive (you can find the one I use here) and can greatly increase your chances for success.
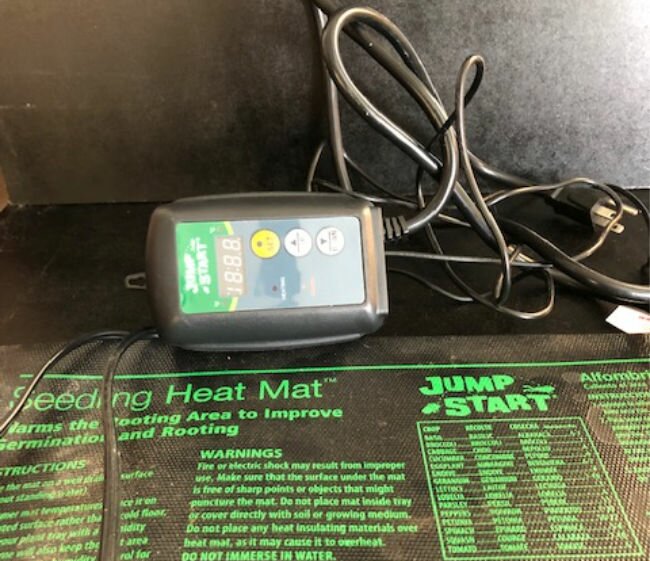
I prefer to use my heat mat with a thermostat because it gives me more control over the precise temperature of my soil. This one is compatible with the heat mat above.
The only drawback I’ve found, at least with the heat mats and thermostats I’ve used, is that you can only hook one heat mat up to the thermostat, so if you’re running more than one mat, you need a thermostat for each. I still believe they’re worth it, though.
Keep in mind that once your seeds germinate, they can be moved off the mat. Since you’ll probably be germinating different seeds at different times based on your last frost date, you don’t need a ton of mats. You can just rotate plants off and new seeds on as needed.
Now that we’ve gone through the five essentials for successful seed starting, you need to know how to get those babies off to a great start. My next post will cover the eight easy steps to happy and healthy seedlings, and you can find that here!!
If you aren’t already an email subscriber, please consider signing up. You’ll receive the contents of this and my next blog post in an easy-to-use 3-page cheat sheet, plus a weekly newsletter with updates around the blog, as well as instant access to my FREE Subscribers Resource Library. That way, you’ll never miss a blog post or a freebie, but you’ll also never have to deal with spam (because I hate it, so why would I do it?)
If you’re so inclined and you have appropriate boards, I’d love some pins of the below pics on Pinterest. Otherwise, keep smiling and have a crazy organic day!
Posts Related to Seed Starting Essentials
- Heirloom Life Book Review
- Container Vegetable Gardening
- My Favorite Seed Companies
- Planning Tips for your Spring Garden
- Seed Varieties I’m Trying this Year

12 comments
Lots of great information in this article and some nice products also..
Glad you enjoyed it.
I have always wanted to have my own little plant nursery. One day I will get it. I enjoyed reading your tips and am filing them away for the future.
🙂 gwingal
Good to hear! I haven’t done a lot of large scale seed saving yet, so that’s my next step.
This is a wonderful post! Dad has grown his own seeds for 80 years; he’s 90+ now. He still grows his own seeds and he and I are buying damson plum trees and planting them. Damson and Blueberry Conserve…YES!
All the information is great and love your sense of humor.
Thank you! I’m glad you enjoyed it. And good for your dad! My dad was an avid gardener too, I miss him!
Seed planting is my favorite time of year too! It’s nice to know I’m not alone 🙂
It’s (almost) as much fun as Christmas. Oh, who am I kidding? It’s just as much fun!
Loved reading your post and learning! I grow micro-greens all year round and it is SO much fun watching them change from sprouts to seedlings.
I grow micro-greens sometimes as well, I actually have a post about starting salad sprouts indoors! I do love them, I just get lazy sometimes and don’t do it, haha.
I have just started an edible garden on my balcony. I was thinking about growing the herbs from seeds to save money because a Ring-tail Possum has eaten my freshly planted herb seedlings. I am going to try and deter the little darling with a garlic chilli spray I have made to spray on the plants and use a net at night.
I had to look up what a ring-tailed possum was (since I’m in the states and we don’t have that particular little cutie), but we have lots of other lovely creatures that eat everything. Definitely try the spray but I think the net will be more effective. You would have laughed your head off at the effort I put in last year to keep the deer from eating my sweet potato plants (and they still got most of them!). Good luck, I hope your efforts pay off!